FTP server on a Raspberry Pi
I have a raspberrypi4 8GB variant, that is running as my network wide Ads blocker pi-hole, my home phone system 3cx and a few test websites on nginx. Yet this raspberrypi4 has a lot more to offer. So why not run an FTP server on a raspberrypi4 to backup all my public sites (of course I backup those ftp downloads to another storage).
Follow this step by step guide to setup your own FTP server on a raspberrypi4 or on any linux system for that matter.
Prerequisites –
- Have a raspberrypi (DUH!)
- Have a second computer to test your FTP server 😛
Time needed: 10 minutes
Steps to follow
- Make sure your system is updated
sudo apt updatesudo apt full-upgrade - Install the FTP server
sudo apt install vsftpd - Edit the configuration file
A few lines need to be edited to achieve our goal. Find the following lines in the configuration file. (Use Ctrl + W to quick search). Change the values of the following lines accordingly.
Open the configuration filesudo nano /etc/vsftpd.conf
anonymous_enable=NO (default Value)
local_enable=YES
write_enable=YES
local_umask=022 (default Value)
chroot_local_user=YES
Add the following lines at the end of the file, these settings lock the server users to the FTP folder within the home directory :
user_sub_token=$USER
local_root=/home/$USER/ftp
Save and Exit the configuration file. Press CTRL + X and confirm with Y to save the settings and exit. - Create FTP user (optional)
It is a good idea to create a different user to access your FTP server which will not have sudo access to the server. Skip to step 6 if you want to use default user pi.
sudo adduser ftpuser
type a strong password and leave everything to default if you like. Your terminal should look like the following image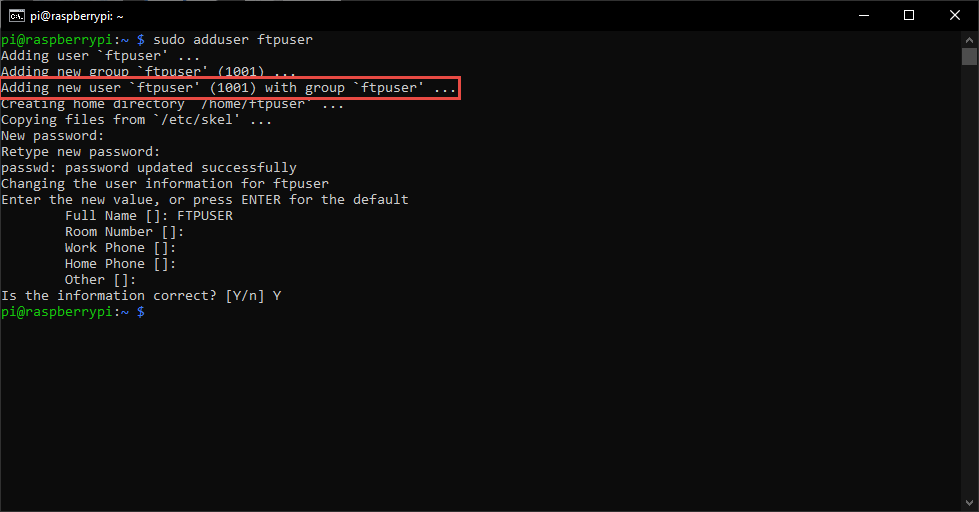
- Create an FTP directory for the new user
We will create an FTP directory and a subdirectory as we will remove write permission in the parent directory.
sudo mkdir -p /home/ftpuser/ftp/backups
The-pargument instructsmkdirto create the entire path tree, both ftp and backups directories.
Since we used sudo to create a directory in the home folder of non-sudo user. The directory belongs to root user.
We can either add the user to sudoer group or change the directory permission. The latter is the better option. To change the ownership type –sudo chown -R ftpuser:ftpuser /home/ftpuser/ftp/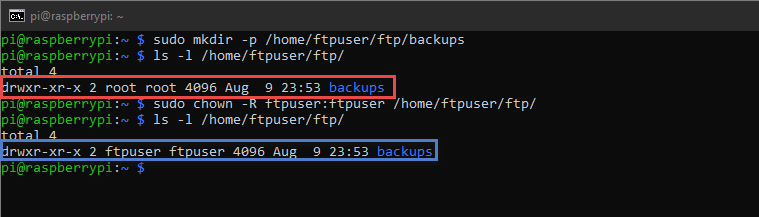
- Change the permissions on the ftp directory:
You must change the permission of the parent FTP directory, otherwise vsftpd will throw an error “vsftpd: refusing to run with writable root inside chroot()”
sudo chmod a-w /home/ftpuser/ftp
sudo is not necessary if you are the default user pi.
P.S. Make sure you have made the directory for pi usermkdir -p /home/pi/ftp/backups - Restart Vsftpd Daemon
To apply the changes we must restart the vsftpd daemon. Issue the following command –
sudo service vsftpd restart - DONE!
All right the FTP server is now working and ready to accept files via FTP. Grab the ip address of the server by issuing
ifconfig, note it down we will need it in a bit. Given below is the process to connect to an FTP server.
Connect to an FTP Server
We need an FTP client to connect to our FTP server hosted on the raspberrypi4. Some of the most popular FTP clients are FileZilla and WinSCP. FileZilla supports almost all the operating systems. However, as I am on windows, we will use WinSCP to access the server.
Step 1: Download you favorite FTP Client. Mine is WinSCP
Step 2: Run the installation file and open WinSCP
Step 3: Select File Protocol > FTP, Encryption > No Encryption. Enter the IP address, username and password. Press LOGIN.

Step 4: Upon login you will see the “backups” folder, that we gave full access to the user named “ftpuser”. Double click on the folder to access. You can only upload files inside it.

Step 5: To upload the required files, drag and drop the files from left window to the right or select the files and click on the upload button or keyboard shortcut “F5” and that is it. The file should successfully upload.

If you like exploring and testing stuffs on your Raspberry Pi, click here for more.
About The Author
Redwan
Just your average IT guy talking about IT stuff.