Installing and Configuring a TFTP Server
TFTP servers are mostly used for the purpose of keeping configuration backup of switches, routers and firewalls. We will be installing and configuring a TFTP Server as well as discuss some security aspects. We will be using Solar Winds free TFTP server. There are a lot of alternatives but I prefer this as it ticks all the right checkboxes for me.
You can download the free version of Solar Winds TFTP server by registering at this link. Once the registration is complete, download and install it.
Configuring the TFTP Server
The configuration of solarwinds tftp server is pretty straight forward. Leaving everything to default should work. To open the configuration window, click on Files > Configure.

On this window, at the bottom you can change the root directory according to your preference. Since, the server I have SolarWinds TFTP server installed is dedicated to managing other servers I am going to keep everything here at its default settings.
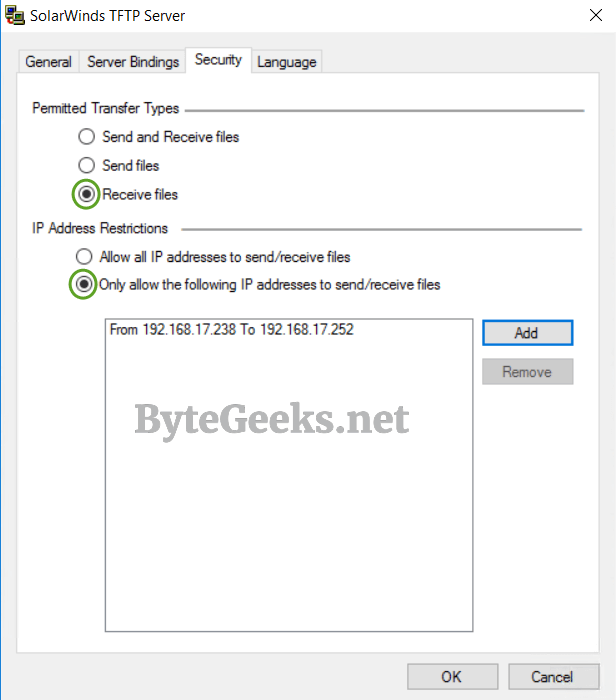
Time to tighten the security of your TFTP Server. Click on the “Security” Tab, here you can control the transfer of files to and from your server as well as restrict access to the server to specific clients. I have the TFTP server configured to receive files, this way your configuration backups cannot be transferred without changing the permission. I have also restricted IP addresses, so that only the network devices which needs to access the server is allowed.
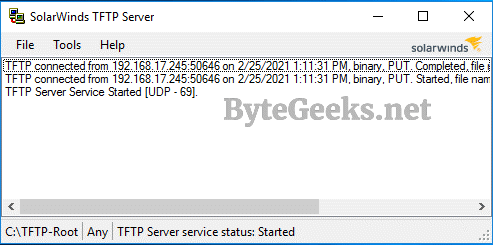
Alright time to test the server. I have logged into a switch with an IP address from the configured range and issued the backup command to backup the running configuration of the switch and VOILA it worked. If you want to know how to backup cisco switches/routers/firewalls, click here.
If you liked this post, leave a comment down below. Visit here for more.
Configure RADIUS authentication for Wi-Fi
Change CRS309-1G-8S+IN to SwOS
Convert .vhdx file to .vhd file
About The Author
Redwan
Just your average IT guy talking about IT stuff.